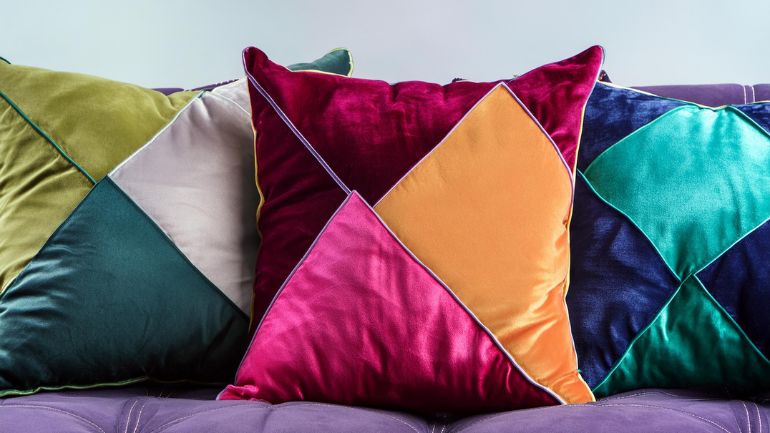
Velvet fabric is a statement of luxury and comfort. It has recently resurfaced as a major trend in home décor, inspiring us to explore its potential beyond the conventional. The result? Velvet geometric color-blocked pillows that add a pop of color and a visual element to any living space. This project is perfect for those looking to refresh their home aesthetics with something vibrant yet sophisticated.
Geometric shapes, particularly the playful yet elegant half-circle offer a modern twist on traditional pillow designs. This shape, along with squares and triangles, forms the basis of our color blocking, providing a canvas for a delightful mix of hues that can uplift any interior.
Moreover, these pillows offer a subtle nod to the holiday season with their rich, holiday-inspired colors, ensuring they remain stylish long after the festivities.
Steps to Create Stylish Velvet Pillows with Geometric Color Blocks
Material you need
- Sewing machine
- 1/2 yard of fabric in total
- Spools of thread matching your fabric colors
- Scissors
- Straight pins
- Sewing chalk
- 12-20 ounces of polyfill (pillow stuffing)
- Wooden dowel (for stuffing)
Quick Note: When color-blocking your pillows, a half yard would be the total amount of fabric needed. For instance, with two colors, you'd require a quarter yard of each color. You must shop for velvet fabric from our velvet fabric collection which is available in a range of colors.
Step 1: Create the Template
Begin by creating templates using a large piece of paper or poster board. For geometric shapes like a half circle, determine the base length and use two pencils and string to create an even half-circle shape. Cut out the template and trace a second one for the back of the pillow. Optionally, add an extra inch to the bottom of the back pillow template.
Step 2: Cutting Fabric
Trace the templates onto the wrong side of your velvet fabric and cut out each shape individually. You should end up with four pieces of fabric - one for the back of the pillow and three for the front.
Expand your knowledge about How to cut velvet fabric properly?
Step 3: Arrange Front Pieces
Take the three pieces for the front of the pillow and arrange them with the right sides facing up, as they will look when sewn together.
Step 4: Sew the Front Pieces
Starting with the piece of fabric on the right, flip it over onto the middle piece and pin it together on the right edge. Repeat this process with the left piece of fabric. Sew a straight line down both pinned edges, remembering to backstitch at the beginning and end of each seam. Once sewn, remove the pins to reveal the front of your pillow.
Step 5: Attach Back Piece
Pin the back piece to the front piece with the right sides facing in. Sew all the way around, leaving a wrist-width gap for turning and adding filling later. Backstitch at the beginning and end of your seam.
Step 6: Final Touches
Turn the pillow inside out and iron it on a low heat setting, with a towel protecting the velvet surface. Fill the pillow with poly filling to your liking, using a wooden dowel to poke the corners as necessary. Hand stitches the opening closed, and your velvet pillow with geometric color blocks is complete!
These stylish pillows are perfect for adding a touch of luxury to your home decor, whether it's for fall and winter or year-round enjoyment. Get creative with your color choices and patterns to make these pillows uniquely yours.
Wrap up
Creating your own velvet geometric color-blocked pillows is a rewarding project that adds a personal touch to your home. The plush texture of velvet combined with bold geometric patterns and vibrant colors can transform any room. If you use these for your living room or bedroom, these pillows provide both comfort and style, proving that sometimes, the best home décor comes from a piece you've made yourself.